Install NextCloud
How to Install NextCloud on Debian 11.
Today I’m documenting the installing process for the latest version of NextCloud. I will be installing this on Debian 11. I will use Apache w/PHP as the web server and PostgreSQL as the database.
NextCloud is a self-hosted alternative to Dropbox and Google Drive. It is made up from a set of server & client applications. With NextCloud you can store various media types all in a central storage location.
Step 1: Prepare you Debian server
After initial installation is complete log in via ssh as root and update the OS.
apt update
apt upgrade
Install “sudo”. The add the user you created during the install to the sudoers group.
apt install sudo
usermod -Gsudo <your_username>
The standard Debian 11 package repositories do not have packages for NextCloud. Therefor we will install NextCloud using the latest source release. But first, we must install all required dependencies.
Step 2: Install PostgreSQL, create database, create user
As a database is required, I will be using PostgreSQL 13.
sudo apt install postgresqlNow, lets create the database, user account and assign permissions. In my case, I’m calling the database and username both “nextcloud”.
# sudo -u postgres psql
postgres=# CREATE USER nextcloud WITH ENCRYPTED PASSWORD 'your_password';
postgres=# CREATE DATABASE nextcloud OWNER nextcloud TEMPLATE template0 ENCODING UTF8;
postgres=# \q
Step 3: Install and configure Apache
NextCloud needs a web server to server the GUI.
sudo apt install apache2Force the redirection of http to https with the following modifications. Enable the mod_rewrite module and configure your VirtualHost in Apache.
sudo a2enmod rewrite

sudo vi /etc/apache2/sites-available/000-default.conf

# Add this before the closing </VirtualHost> block, Save, Exit

        RewriteEngine   on
        RewriteCond     %{SERVER_PORT} ^80$
        RewriteCond     %{REMOTE_ADDR} !^127.0.0.1$
        RewriteCond     %{REMOTE_ADDR} !^\:\:1$
        RewriteRule     ^/(.*)$ https://%{SERVER_NAME}/$1 [L,R]
Restart Apache
sudo systemctl restart apache2Step 4: Install and configure PHP
NextCloud requires a number of PHP packages.
sudo apt install php php-bcmath php-cgi php-cli php-common php-curl php-gd php-gmp php-imagick php-intl php-ldap php-mbstring php-memcache php-pgsql php-xml php-zip libapache2-mod-phpThe PHP configuration needs a little tweaking for your environment. NextCloud has recommended configuration changes for PHP.
Edit your php.ini file for apache:
sudo vi /etc/php/7.4/apache2/php.iniBelow are configuration variables that need to be updated to fix your environment. Update according to your needs. Refer to https://www.php.net/manual/en/timezones.php for a list of available values for the date.timezone variable.
date.timezone = America/Los_Angeles
memory_limit = 512M
upload_max_filesize = 200M
post_max_size = 200M
max_execution_time = 600
;output_buffering = 4096 ; Comment this out
Depending on the NextCloud apps you choose to install, additional packages may be needed.
Step 5: Download and extract NextCloud
Grab the current release of NextCloud from their release folder. Extract the contents of latest.tar.bz2 using tar. Remove the source file.
wget https://download.nextcloud.com/server/releases/latest.tar.bz2
tar xf latest.tar.bz2
rm latest.tar.bz2
Set permissions and move the folder to the Apache web folder.
sudo chown -R www-data:www-data nextcloud/
sudo chmod -R 755 nextcloud/
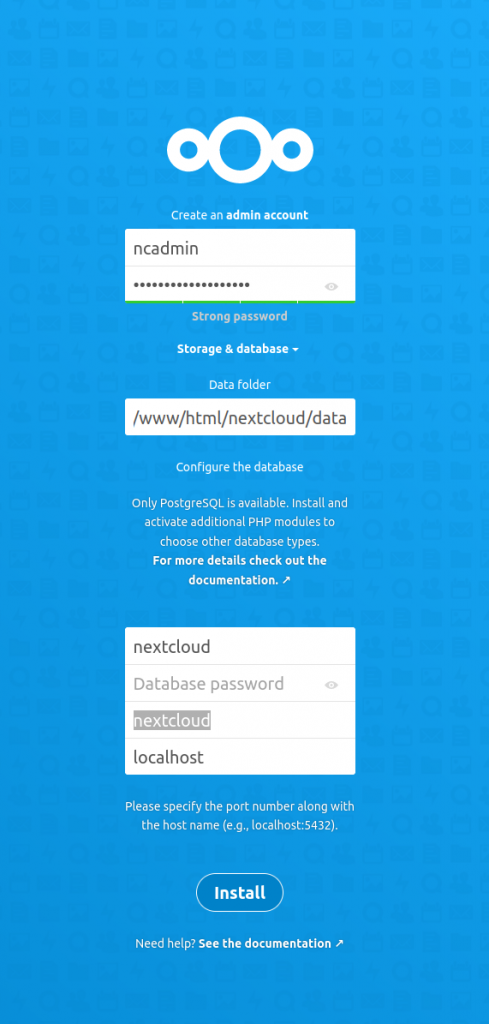
sudo mv nextcloud/ /var/www/html/Step 6: Install NextCloud
Using your browser of choice, browse to your newly created and installed server IP address: http://<IP_ADDRESS>/nextcloud/
Step 7: Install Recommended apps
If everything goes as planned, you should be presented with a page asking you to install all recommended apps. If you want these, click the “Install recommended apps” button at the bottom of the page. You should see a little spinning progress indicator to the right of each apps name as it is being installed.
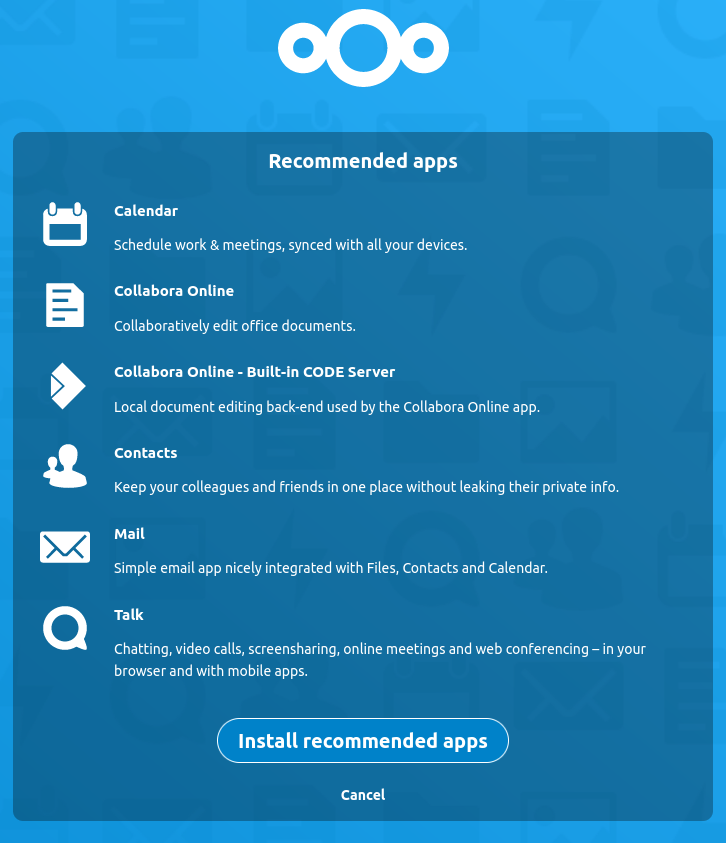
You will be redirect to the dash board after the installation is complete. If errors were encountered during the installation process they will be displayed under their associated apps heading.
The following can be completed after the initial configuration of NextCloud. To ensure that your NextCloud instance is secure we need to enforce the use of https. Now would be a good time time to update the NextCloud configuration file with the correct hostname for your server.
Open ‘/var/www/html/nextcloud/config/config.php’ and follow along:
sudo vi /var/www/html/nextcloud/config/config.php

# update the following
 'overwrite.cli.url' => 'https://<hostname.tld>/nextcloud',

# insert this line
 'overwriteprotocol' => 'https',
Step 8: Post install settings
First, as your admin user, go to user Settings -> Administration -> Overview. The system will perform some checks and provide details about Security & setup warnings. Read through these warnings and try fixing everything that comes up.
Step 9: Create a new group
Log into NextCloud with your Admin account. Click on your profile picture and click on Users. Click the “Add Group” button. Enter the name of the group. Click the right arrow [->] button.
Step 10: Create a new system user
Click “New User”. Add the details for your new user. Click “Add a new user”. Done!
Step 11: Add email account to new user
Follow these steps to add an email account to the newly created user account:
- Login to NextCloud with the new users credentials
- Click the envelope with the label of Mail in the top tool bar
- Enter your “Display Name”, email address and password
- Click “Connect”
If everything worked, you should be redirected to a new page where you see the contents of your email account.
Step 12: Setup mobile device
Install the mobile app just as you would any other app from your app or play store. Search for NextCloud and make sure the author is NextCloud. After you have the app installed, you will need to provide the URL for the NextCloud server and your username and password.
After you have entered these details, you will be presented with the documents and file available in your profile.
Conclusion
Hope this wasn’t too painful. Let me know if you have any questions or suggestions for improvement.
About the Author
Jim Lucas
Owner and proprietor of this establishment